In conjunction with jmdt & with advice from Willng3, this is the latest in our series of domination decks:
This deck may be the king of all score farmers against the current set of elder decks, once you have learned to properly harness its power.
Max Efficiency Build:
Hover over cards for details, click for permalink
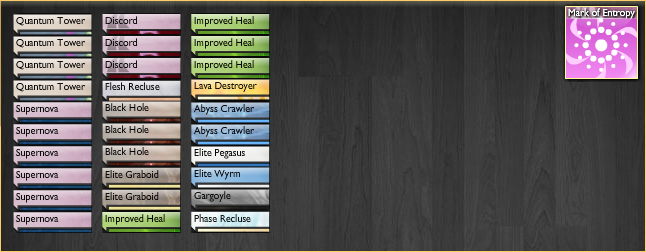
6qq 6qq 6qq 6qq 6u3 6u3 6u3 6u3 6u3 6u3 6u5 6u5 6u5 713 74f 74f 74f 77g 77g 7ai 7ai 7ai 7ai 7dq 7gm 7gm 7jr 7mu 7tf 80g 8pjThis should be used by those who are familiar with the Elder decks, forwards and backwards, & want to farm some serious score. It is also a good idea to be familiar with the strategy section of this deck, and how it interacts with each of the AI3 decks.
Stats, Stats, Stats! (Recorded on High AI Speed, Low Quality)
| Deck | Games | TSE | Avg. TTW | Avg. Sec./Game | Wins | Losses | EMs | Win % | EM % |
| TADAbow | 200 | 1513.085 | 7.43216 | 67.005 | 199 | 1 | 166 | 99.0 | 83.0 |
| USEMosis | 200 | 1430.595 | 7.2268 | 66.405 | 194 | 6 | 154 | 97.0 | 77.0 |
| USEM | 200 | 1416.002 | 7.0000 | 64.055 | 191 | 9 | 145 | 95.5 | 72.5 |
Strategy:Intro:The TADAbow itself is meant to function as a rush, while offering some denial/shutdown/ & healing in support. The idea is to get an early discord out, allowing you to play your many creatures to deal damage while the Elders are unable to play. The deck is setup so that if a discord does not come out in the initial draw, the rush component should be able to function independently of the shutdown component. In cases where a discord comes early but creatures are lacking, the deck is designed that in theory, it will shutdown effectively enough to allow those creatures to be spammed as they come out. Many component parts makeup the keys to maximum efficiency in score farming with the TADAbow as follows:
Discarding:It is a common occurrence with the TADAbow that you will need to discard at the beginning of the match. The deck is a slightly slow starter at times. The idea is that you will need to be familiar enough with the deck to know which cards are the best to discord without crippling your subsequent round. This is performed a bit off of feel, but you can follow some basic guidelines to help guide you towards success.
Priority Discarding:
1. Discord - if you have drawn more than 1 and the opposing deck contains no PC. This requires intimate knowledge of all AI3 decks.
2. Supernova - Usually a safe play if you have drawn more than 2 (discard a 3rd)
3. Heal - Probably the most common play, the deck has ample healing and you want to prioritize the ability to play creatures when the quanta becomes available, as this is more vital to success than being able to heal up afterwards. Many games will be finished with excess healing in your hand and if you discard a heal, it is likely more will come.
4. Black Hole - Last resort, but these are typically more important to hold onto than heals, but less important than creatures.
There are other instances you may want to discard BHs over heals, if you begin with 2 BHs and 1 Heal for instance, but if you are playing the Darkness or Mono Aether elder, this is typically not the case.
Get to know your holes:It is important to realize how flexible your black holes can be in the TADAbow. Along with careful discards and keen quanta watching, effectively utilizing your BHs is the key to keeping your TTWs low and your EM % high. I will outline the uses for black holes as follows:
1. The Launch Hole - Many times you will hold onto your hole until just after you play a creature in order to maximize damage that goes through. If you can time it properly, playing a black hole at the right moment can give you 2 or 3 pure, unadulterated turns of bliss where all your creature damage successfully lands. More specifically, it is often important to use BHs immediately after playing your lava golem or evolving your graboids into shriekers.
2. The Naked Hole - This is probably the most advanced type of hole, but it involves playing a hole when you don't have a discord on the board in order to prevent specific CC or opposing creatures from being played. This works in close conjunction with watching opposing quanta landmarks, and preventing these landmarks from being reached.
3. The Final Healing Hole - Quite often, if you do not hold a heal in hand, you may want to forgo the shutdown aspect of a hole, in favor of getting a last bit of healing to reach EM. This can be a bit of a gamble, as you will generally commit to this strategy a turn or two before finishing the game, but a resulting EM will often pay dividends.
4. The Denial Hole - This is just a black hole which is played with its most common purpose: prevent opposing quanta from building up, and consequentiality preventing perms, creatures, and CC from being played.
Quanta watching and landmarks:It is crucial to quickly take mental notes between turns depending on which AI3 deck you are facing. I will detail below which cards each elder deck contains that you need to be wary of, and also how much quanta it costs for your opponent to play these cards. Typically, those which will be outlined are CC or Perms, because those pose the biggest threat to reducing your EM potential and raising your TTW. Keep in mind that there is a bit of a game of chance you will play with the RNG, as your goal is to have your discord drop the opposing quanta levels below these landmarks AFTER scrambling.
Elder by Elder Breakdown: (http://elementscommunity.org/forum/index.php/topic,17934.0.html) (click for link to decks) (Stats taken from 200 game sample)
Aether (Mono)
Win%: 100 EM%: 30 TSE: 933.33 TTW: 8.6
Landmark Cards(42 card deck)-
Dim Shield(5): 6

Lightning(3): 2
Strategy-
You may want to cover your graboids and lava golems when launching if the Elder gets a poor quanta draw, but typically you are playing a game of just trying to prevent dim shields from coming out. If the Elder does manage to play a dim shield, attempt to pull his quanta below 6 with a black hole the turn before it expires. Remember to use heals mid-game (without topping off) anytime health is between 60-80 in case of a last turn silence in order to maximize score.Air (Trio with Light, Life)
Win%: 100 EM%: 91.67 TSE: 1650.85 TTW: 7.58
Landmark Cards (40 card deck)-
Shockwave(3): 2

FFQ(6): 7
Hope(4): 7

OE(3): 5
Strategy-
Generally, you are just trying to prevent OEs and FFQs from appearing. Low cost shockwaves means you probably want to cover your golem's launch with a BH, but typically save shutdown for preventing OEs and FFQs. Consider slow-playing golems a turn behind other creatures to draw out shockwaves. A hope should never really show up unless you have the worst draw in the history of TADAbow.Darkness (Duo with Entropy)
Win%: 100 EM%: 100 TSE: 1548.39 TTW: 8.31
Landmark Cards (38 card deck)-
Pandemonium(5): 3

Strategy-
Just keep your right eye on his entropy quanta all match because your biggest threat and major concern is pandy. You should focus your entire efforts on keeping his entropy below 3 if you have more than 2 creatures on the board. On occasion, he will burn a pandy on a lone shrieker or lava golem, but typically these are handled by Drain Life and Liquid Shadow. There is a dusk mantle that may appear, which is a major concern, but should only be an afterthought to preventing pandies from going off.Death (Duo with Entropy)
Win%: 100 EM%: 80 TSE: 1663.1 TTW: 7.0
Landmark Cards (42 card deck)-
Pandemonium(1): 3
Bonewall(1): 7

Mutation(3): 2: death
Strategy-
Really easy matchup as this deck is a rather poorly constructed one. Pandies are less numerous here than the darkness elder. Mutations are the primary CC, but more difficult to prevent because of their low cost.Deja Vu/Dune Scorpions (Time Mark, Duo with Light)
Win%: 100 EM%: 58.82 TSE: 1056.96 TTW: 8.7
Landmark Cards (35 card deck)-
Reverse Time(3): 2

Sundial(4): 1
to play, 1
to activate
Procrastination(1): 6
Strategy-
The outcome is a little out of your hands vs. this deck and sorta pre-determined by your/the Elder's draw. You probably want to slow play your heavy hitters in order to draw out RTs on more spammable things such as flesh recluses. Do your best to prevent RTs and sundials from being played/drawn upon.Earth (Duo with Gravity)
Win%: 100 EM%: 92.86 TSE: 1574.39 TTW: 7.92
Landmark Cards (53 card deck)-
Basilisk Blood (4): 2

Auburn Nymph (1): 8
Otyugh (1): 4

Strategy-
Pretty straightforward matchup for the most part. BB is too cheap a cost to really be able to stop it from being played. The Oty can be a concern, particularly if it comes out early, but you should have enough high hp creatures to play through it. 1 Colossal Dragon, 1 Stone Dragon, and 1 Titan will be the biggest threat to your EM potential.
Fire (Duo with Darkness)
Win%: 100 EM%: 89.473 TSE: 1638.92 TTW: 7.263
Landmark Cards (41 card deck)-
Rage Potion(6): 3

Dusk Mantle(1): 6

Strategy-
Your battle here is against preventing rage pots. This Elder will most undoubtedly have at least 1 in its opening hand. If you can conquer these, you are in the clear.
Gravity (Mono)
Win%: 100 EM%: 88.89 TSE: 1745.90 TTW:7.0
Landmark Cards (44 card deck)-
Otyugh(3): 4
Gravity Shield(1): 5
Strategy-
Be aware of otys when they join the field. Your biggest concern is a momentumed oty in combination with a gravity shield. This doesn't happen very often, especially if you are keeping this combo in mind when optimizing your play.Life (Duo with Entropy)
Win%: 100 EM%: 100 TSE: 1726.03 TTW: 7.2
Landmark Cards (38 card deck)-
Fallen Elf(4): 4
Maxwell's Demon(3): 5
to play, 2
to activate
Strategy-
When playing this elder, focus on shutting down entropy to enable your offense. This elder's primary damage comes from its life quanta. An overall Denial Hole strategy seems to work best vs. this elder for EMs.Light (Duo with Air)
Win%: 100 EM%: 94.11 TSE: 1762.37 TTW: 6.06
Landmark Cards (39 card deck)-
Wings(1): 4
OE(2): 5
Strategy-
Again, an overall Denial Hole strategy works best vs. this elder for scoring EMs. I can honestly say I've never seen a sky blitz played when facing this elder with TADAbow.Scarabs (Time Mark, Trio with Gravity, Life)
Win%: 100 EM%: 93.75 TSE: 1485.41 TTW: 7.688
Landmark Cards (41 card deck)-
Pharoah(4): 9
Procrastination(1): 6
Strategy-
This elder will use life quanta for defense, but your focus should remain on keeping his time quanta low. You may need to zero out his gravity quanta with a black hole before playing your lava golem if there are 2+ scarabs on the field.Rainbow (Time Mark)
Win%: 100 EM%: 66.7 TSE: 1242.86 TTW: 8.25
Landmark Cards (40 card deck)-
Shockwave(1): 2
Lightning(1): 2
Plague(1): 4
Black Hole(1): 4
Strategy-
Things can get quite out of hand quickly with a poor draw as your discord does nothing more than accumulate damage. The key is playing black holes once his quanta pools reach 2-4 to stall him from playing anything for as long as possible. Once his creatures start to hit the field, it can be problematic as they contain heavy CC in their activation skills.Water (Duo with Fire)
Win%: 100 EM%: 94.4 TSE: 1563.0 TTW: 7.61
Landmark Cards (42 card deck)-
Ice Shield(2): 6

Rain of Fire(2): 7
Red Nymph(1): 8
to play, 3
to activate
Strategy- Again, overall denial is the best strategy for success as most of this Elder's cards that will really cripple you are quanta intensive. Deck has 2 spammable freezes which you will not be able to stop, but denial makes this Elder quite simple.With these strategies, you should be able to maximize your TSE (score/hour) once they are implemented flawlessly.


 Guest Posts