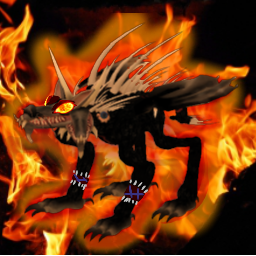
Step 1: Get a basic Dog Pic you want to mess with. -> go to
http://www.spore.com/sporepedia#qry=all -> click "Search"
-> Search for "Dog" (or alternatively anything you might give you an appropriate search resault)
-> Click on an image you like. (for this example, I picked "Demon Dog" by dragonwolf97)
-> Right click on the Image and then "Save as..."
-> Save it somewhere, where you will find it again.
-> [optional] Send a "thank you" to the creator of the image. This will make the artists day.
Step 2: Get a background. -> go to
http://www.sxc.hu/ -> enter on the top left a searching term, what you would like the background to be. (for this example, I searched for "Fire")
-> Pick a royalty free pic you like and save it on your computer. (I took "Fire Pit 1")
-> [optional] Send a "thank you" to the creator of the image. This will make the artists day.
Step 3: Put the Dog on the Background. -> go to
http://pixlr.com/editor/ -> Click "Open from your computer"
-> Find the pic you saved in Step 1 and open it.
-> Now open the background (Data -> Open image...)
-> Click on the window with your background and resize the image so the smaller number is at least 256 (Picture -> Picturesize...)
-> Hit "OK" and watch the pic getting resized.
-> Hit now "Ctrl + A" on your keyboard and then "Ctrl + X". You background pic should now be gone.
-> Click on the window with your dog and hit "Ctrl + V". Your dog should now be gone and replaced with your background.
-> Drag & Drop the layer of the Background below the layer of the Dog.
-> Your dog should now be seen on top of your background.
-> [IMPORTANT!] Click now "Ctrl + S" and save this Template as a "PXD" file.
-> [IMPORTANT!] Click "Ctrl + S" later on, whenever you did something you liked. If you accidentally destroy your picture at some point, it's good to have a backup you can fall back on.
Step 4: Messing with your picture. (Selfmade Glow) -> Click on "New Layer"
-> The new Layer should now be between the dog and the Background.
-> Pick the brush tool and a color of your choice.
-> Check that the empty layer is selected, then paint over your whole dog's body
-> [optional] I picked first yellow and painted a lot around the dog, then red and closer around the god.
-> Set the Covering Power to around 40%
-> Enjoy the self made glow.
Step 5: Messing with your picture. (Add accesoire) -> Find any royalty free pic you would like to add to your dog.
-> For this example, I searched for "glowing eye" on
http://www.sxc.hu/ and then picked the "dragons eye"
-> [optional] again, thank the artist. It will make him/her happy.
-> Same procedure as you know it: Download it, open it on your pixlr.com page.
-> Before messing with this new pic, unlock it by doubleclicking on the lock. (This will allow you to delete the ground layer. makes your life easier.
-> With the lasso symbol, you can cut out a specific part of your accesoire pic.
-> "Ctrl + X" will cut the selected section out.
-> Now, directly paste it into the same pic with "Ctrl + V" (it might have moved a little, but that doesn't matter)
-> delete your first layer.
-> Use the rubber, to make the corner smoother.
-> Resize the Image to fit to the dog. (I did it here to 30x22 pixel)
-> "Ctrl + X" and in the dog's pic "Ctrl + V" will move the pic to your dog's pic.
-> Move this new layer to the top.
-> Use the move cursor to move the accesoire to your desired position.
-> Enjoy your dog with a Dragons Eye.
Step 6: Messing with your picture. (Do whatever you want) -> Repeat steps 4 & 5 with whatever you like.
-> When you are happy with your dog, click "Ctrl + S" on your keyboard and save your dog as PNG when you are finished.
-> You can now upload it somewhere (like
http://beta.photobucket.com/)
-> Enjoy your very own dog of awesomeness!

-> [optional]Thank the creator of this Tutorial, or give him reputation power. It'll make him happy.

